Visualizzazione post con etichetta quaderni. Mostra tutti i post

school time


Buongiorno amiche!!!
un altro mese è finito... e settembre è già inoltrato... è tempo di nuove sfide in casa SOG!!
questo mese il tema è "off t school" un tema molto attuale e sentito per me, e per molte di voi immagino, perchè le stelline quest'anno iniziano la materna... sarà una bellissima avventura che attendo con un mix di ansia e felicità!!! =D

Good morning ladies... September started already and with him the last Some Odd Girl challenge!! This month the theme is "OFF TO SCHOOL", a very dear theme to me, since my little stars start the kindergarden, it is going to be a big change...


per l'occasione ho realizzato un piccolissimo quadernino, con copertina in craft, e pagine i cartoncino avorio, che userò per annotare le cose importanti della materna, per conservare alcuni ricordi qualche foto e qualche appunto...

I made a little book to write all the most important stuff of the school... the cover is made in craft bazzil, and the page are clean to be written or to glue some picture on it


ho usato teacher's pet tia e measure up Tobie e li ho colorato con le matite prismacolor...

I used teacher's pet tia and measure up Tobie and colored them with prismacolor...


la scritta l'ho fatta con il vinile rosso, e poi ho aggiunto qualche enamel dot

the word is made out of red vynil, cut with the cameo, and embellished with some enamel dots


per oggi è tutto... vi ringrazio per la vista, e vi aspetto qui nei prossimi giorni... nel frattempo aspetto di vedere le vostre meraviglie per il challenge!

Today that's that, I thank you for you visit, and wait you back here very soon, I wit to see what you make for the challenge...

back to school


Buongiorno amiche, oggi inizia una sfida a casa Tiddly inks... il tema è back to school!

good morning friends, today is time of new challenge at Tiddly Inks... and the theme is Back to school... I suggest you to go and have a look of all the wonderful projects my DT mates made! =)


...visto che con l'inizio delle scuole er noi mamme si intensificano sempre gli impegni (anche per quelle come me, che anche se hanno ancora i bimbi a casa non sanno stare ferme) ho pensato ad un quadernino, per prendere appunti, scrivere memo e annotare appuntamenti. 

...since the school starts make all moms busy, even those like me who still have babies at home, but are not able to stay without doing something, I thought to make a note book, where to write down some note, memo, or appointments...


Ho fatto il dorso in lino, e ho applicato un meccanismo a due anelli. L'immagine è la helper teacher, adorabile vero? Ho colorato con le matite, e mi sono cimentata nella prima (quasi) monocromatica colorazione della mia vita! =)

I made the edge with linen fabric, and applied inside ea 2 ring mechanism. The image is helper teacher... isn't she adorable? I colored her with my polichromos pencils, and tried the first (almost) monochromatic coloring of my life! =) 


Dentro ho sistemati delle pagine bianche, e 4 divisori che ho realizzato con la cameo per tenere più ordinati gli appunti.

Inside I put white sheets, organized and divided by 4 file tabs, to keep all the notes organized! =)


...e per oggi è tutto mi pare... grazie per la vista, e a prestissimo con altri progetti!

thanks a lot for passing by... and see you very soon back with others projects!

London little notes


Buongiorno ragazze... come va??
Io bene... siamo esausti dopo due giorni di fuoco, ma siamo nell'altra casetta finalmente! =) Sabato abbiamo traslocato, e ora pian pianino resta solo da sistemare tutte le cosine. Siamo ancora sommersi di scatoloni, scatoline e scatolette, ma piano piano ne verremo fuori, e soprattutto piano piano inizia a prendere forma tutto! =)

Good morning girls… how are you??
I am fine… we are really tired, after a very busy weekend, but we re finally in the new home, Saturday we moved, and yesterday spent the all day trying to organize all the stuff… we are still overloaded by boxes and bags all round, but slowly we will get ready of it! =)


Oggi Come promesso volevo mostrarvi la seconda delle due agendine fatte per Miryam, la seconda come preannunciato era a tema “Londra”, come resistere quindi al fascino della cabina telefonica londinese di Magnolia??? Ovviamente le immagini sono colorate con i copic…

Today as promised I’d like to share with you the second of the 2 little notebook I made for Miryam, the theme was “London” that’s why the Magnolia vintage phone booth was perfect! =) The images are colored by copic…


 Le carte sono maja design, e ho cercato di mantenere i colori della bandiera inglese… Poi ho stampato la bandierina. Anche qui la penna è bloccata con l’elastico


The paper is maja design, I tried to use the English flag colors…


Ora vi saluto, e vi auguro una buonissima giornata… io devo sbrigare un paio di commissioni oggi, e poi mi dedicherò ancora all’apertura degli scatoloni! ;) Spero voi abbiate di meglio da fare, ad ogni modo, grazie della visita… e a tutte voi una splendida settimana!! A presto!

As usual I also decorated the back.. and that’s that today…
Now I have to go, I have to do a few things today, and then I’ll have to keep on opening box and organize stuff… I hope you have something better to do, anyway thanks a lot for passing by, and I wish a great day and a lovely week to all of you! ;)

Quadernino marino


Buongiorno gente... come va?
un altro fine settimana finito... mamma come corre il tempo... vola via senza che neanche ce ne accorgiamo... 
ma bando alle ciance e veniamo allo scrap, questa che vi mostro oggi è una delle due agendine che mi ha richiesto la cara Miryam, per la quale già in passato avevo realizzato diverse cosine... me ne ha chiesto una a tema marino e l'altra a tema Londra, ma la seconda ve la mostrerò nei prossimi giorni! ;)

Good morning folk... how are you?
another weekend has gone... wow how fast s running away time.... 
But let's see my project now.. it is a little note book, in a marine style, which I have been asked for by Miryam, a dear person I already did a few things in the past... she asked me 2 note book, this and another one, in London style.


Il timbro è magnolia, colorato con i copic, sotto per dare risalto all'immagine ho usato una garzetta.

The stamp is Magnolia, colored with copic, and I applied some gauze under it.


L'ho rilegato con la bind it all, e la penna l'ho fissata con un anellino di elastico.... nei prossimi giorni poi vi mostrerò l'altra, e il meraviglioso regalo che mi ha mandato Miryam, e col quale mi ha davvero commosso... intanto invece vi ringrazio per la visita, come sempre, e vi do appuntamento nei prossimi giorni! ;)

I used the bind it all to make it, and I fixed the pen with an elastic band... next days I'll show you the other one, and the lovely present Miryam sent me, and which made me move!
For now instead I say thanks for passing by once again, and I wait you back here soon...

Compleanni scrapposi


Buongiorno amiche mie creative!!! Come state?
Io tutto bene... pronta per iniziare una nuova settimana, e piena di mille idee che mi frullano per la testa... ma oggi mi limito a mostrarvi un blocchetto che ho fatto per il compleanno di Nico!!

Good morning friends!! how are you?
I am fine... I am ready to start a new week, full of new ideas on my mind... but today I have a new project t share with you a little thing I made for Nico!


Io e Nico abbiamo tantissime cose in comune, una di queste è sicuramente la passione per i copic... lei è la mia guru, e maestra!! =) Quindi quest'anno anziché la solita card per il compleanno ho pensato di farle questo mini blocchetti per gli appunti sulle colorazioni! =)

Nico and me have a lot in common, and some we have in common is the passion for copics... Nico is my teacher and my inspiration, that's why this year instead of the usual card I thought to make this little block notes to write the copic notes! =)


Questa bambolina coi copic in mano è una meraviglia... non trovate? 

This little doll with copic is lovely, don't you think?


Questo è l'interno, dove ho fatto una bustina per contenere un piccolo biglietto per scriverle un pensiero speciale per il suo compleanno! =)

This is the inner, where I made a little pocket for a little card, to write a special wish for Nico! =)


questo infine è il retro... semplice semplice ma carino, e devo dire che credo sia stato gradito! ;)
Bene... per oggi è tutto, e vi saluto perchè devo fare mille mila cose, e visto che i miei ritmi diventano più lenti e le cose da fare si accavallano è bene che mi metta in moto da presto!! ;)
Grazie a tutte voi che mi chiedete mi mandate messaggi carinissimi e mi chiedete della gravidanza... la pancia cresce a vista d'occhio!! =)
Grazie della visita, e a prestissimo!! =)

This is the back side.. it is very simple simple, but nice, and I think she appreciated it! ;)
Well... that's all, I go now because I have a lot of things to do, and I am getting slow and slow... thanks to all of you who asked me about the pregnancy, the belly is growing so fast!! =))
Thanks for passing by, and see you soon back!! =)

Quadernino

 Buonasera amiche!
come state? io bene... oggi mio marito ed io abbiamo fatto gli zii-sitter =) e avevamo i nostri 2 nipotini a casa tutto il giorno: che amorini!!! =) una delle prime cose cje mi hanno chiesto è stato di fare i "lavoretti".... quindi evvai di fustelle, tagli colla e colori!!! E' stata proprio una bella giornata! =)
...ma ora veniamo allo scrap... ecco un quadernino che ho fatto qualche tempo fa, da spedire in regalo.... che ne dite??

good evening!
how are you? I am fine... today my hubby and me were uncles- sitting, and we had our two lovely nephews at home all the day long... has been a lovely day, one of the first thing they asked me was: "Auntie shall we craft??" I love them!!! =)
but now let's talk of scrap.... this is a little book I made as present some time ago...


...era per Miryam, che tempo fa me ne aveva ordinato 2 da regalare alle maestre... e gli erano piaciuti un sacco... quindi ho pensato di farlo anche a lei! =)
Il timbro è The Greeting farm, ed è colorato con i copic... la carta è DCVW, sono vecchie e non le usavo da un pò ma mi piacciono sempre molto... e poiu questi colori mi fanno proprio pensare alla primavera! =)

...it was for Miryam, she ordered me two little books last year, as present for her little girl teachers, and she loved them, so I thought to make one for her as well...
the stamp is the greeting farm, colored with copic, and the paper is DCVW I love it!!


...questo per oggi è tutto... vi auguro un bellissimo weekend... io farò il pieno di bimbi anche domani, perchè è il compleanno di Edo, il bimbo di una mia carissima amica, e Carlo, Giacomino (nipotino nostro) ed io andremo li dalla mattina, per aiutare e giocare!!! =))
Grazie per la visita... e a presto!!!!

...and that's all... I wish you a lovely weekend... I'll spend again a full day with children tomorrow, cause it is dear's friend's baby birthday... and I'll be there to help and play, with my lovely nephew!! =)
I wish you a lovely day, and a great weekend!! =)
thanks for passing by, and i wait you back here soon...

Japanese style little book


Buongiorno amiche...
come state? Io bene... ho passato un bellissimo weekend, all'insegna dello scrap e del relax, ed ora sono pronta per una nuova, pienissima, settimana! =) Per iniziare bene la settimana vi mostro un lavoretto semplicissimo che ho fatto...

Good morning friends...
How are you? I am fine... I enjoyed a lovely relaxing and crafting weekend, and now I am ready to stand a busy long week... To start the week i show you this very simple book I made...

Un piccolo quadernino da borsetta che ho alterato... la carta è my minds eye, e il timbro è the greeting farm.

the paper is my mind eye, and the stamp is greeting farm


Il timbro è colorato con i copic... potevo fare meglio, lo so, ma mi accontento... e continuerò ad esercitarmi! ;)

The stamp is colored with copic... I could better I know... but that's fine! =)
il timbro e l'etichetta li ho applicati con del biadesivo spessorato.

I applied the stamp and label with 3D foam.


Il retro ovviamente anche lui decorato e alterato...
... e questo è quanto, è semplicissimo, ma il risultato finale non mi dispiace...
Vi auguro una piacevole bellissima settimana, e vi ringrazio per la visita! =) a presto!

and the back altered and decorated as well...
that's all... I wish you a lovely nice week, and hope to see you soon here again! thanks a lot for visiting! =)

Con questo progetto partecipo a: / with this project I enter:
Fairy tale challenge: sewing (cuciture, vere o finte)
Sweet stampin' challenge: swirl e perle
Bunny zoe's crafts: anything goes
The ABC challenge: g for going dotty

libro firme per matrimonio


Buongiorno!!
Che bello oggi è già Giovedì... e il finesettimana è sempre più vicino... =)))
ma intanto vi volevo mostrare questo libretto firme che ho realizzato qualche tempo fa... Le misure sono un tantino inusuali, 15x15, ma volevo cambiare!! =)  

Good morning!!
Wow I'm happy today is already thursday... and the weekend is arriving!! =))
But at the moment I'd like to show to you the wedding  guestbook I made some time ago... The size is a bit unusual, it is 15x15 cm! =)


I timbrini sono The Greeting farm, colorati con i distress, e la carta è my mind's eyse.

The stamps are TheGreeting farm, colored with distress, and the paper is My mind's eyes.


Sotto la rosellina ho appeso un cuoricino con scritto "handmade with love" e applicato i 2 spilloni con i cuoricini!

Under the little rose I applied a little silver heart charm with the sentence "handmade with love" and the 2 hearts pin! 


E per oggi questo è tutto... vi auguro una buona giornata, e vi aspetto qui nei prossimi giorni! grazie della visita!! =)

and that's it... I wish you a lovely day, and I wait you back here next days... thanks for visiting! =))

Con questo libro partecipo a: / with this guestbook I entyer:
Bunny Zoe's crafts: anything goes

Tutorial guestbook: rilegatura alternativa!

Buongiorno!!!!! sorpresa sorpresina: oggi un tutorial!!! =)))
In realtà mi sembra un parolone tutorial.... ma visto che già l'altra volta qualcuno mi aveva chiesto info sulla rilegatura, questa volta ho scattato qualche foto, ed ora cerco di spiegarvi tutto!!! =))
ma andiamo con ordine:

Goodmorning!!! Surprise surprise: today a tutorial for you!! =))
Actually some of you asked me some info also when I make the first time this binding way... so this time I made a tutorial, with the step by step pictures:


Materiale occorrente:
cartoncini avorio A4
cartoncino lilla
cartone grigio da 1,5 mm per cartonaggio
Lino grezzo,
filo di cotone un pò grosso
nastro di raso
colla a beccuccio fine, punch ago da lana con punta taglierina scor pal, osso di balena colla da cartonaggio.

What you need:
card stock ivory A4
violet card stock
Grey thick card stock, 1,5 mm thick
natural linen
satin ribbon
glue, punch, needle, cotton wire, scor pal, glue for card board.


Col cartoncino lilla tagliare delle striscine di carta da 2", ne serve una ogni due fogli di carta, piegarli a metà, a questo scopo sarà utilissimo lo scorpal, e punchare tutto il bordo con un motivo a piacere.

With the violet card stock cut some stripes of paper 2" wide, and score them at the centre, at this point the score pal would help a lot! =) then punch them, with a punch you like! =)


A questo punto si può procedere ad incollare i fogli alle striscine punchate, come nella foto sopra, in questa fase bisogna fare attenzione a lasciare una piccola striscina al centro libera, questo consentirà alle pagine di chiudersi bene, ovvero i due fogli incollati alla striscina non si devono toccare al centro. Una volta assemblate tutte le pagine procedere dividendole in gruppetti da 4, insserendole una dentro l'altra, come nell'ultima foto del collage. Si potrebbero lasciare anche singole (come avevo fatto nell'altro album) ma visto che questa volta avevo necessità di avere molte pagine, questo rende il lavoro un pò più semplice e veloce...

At this point you can glue the pages at the violet stripes, as you can see in the picture, make sure the ivory pages do not touch each other in the center, so the page will open and close without problems Once you glue all the pages two by two, you can separate them into little groups of 4 sheets each, as you see in the last picture of the collage. This will make all the work easier, since the pages are a lot! =)


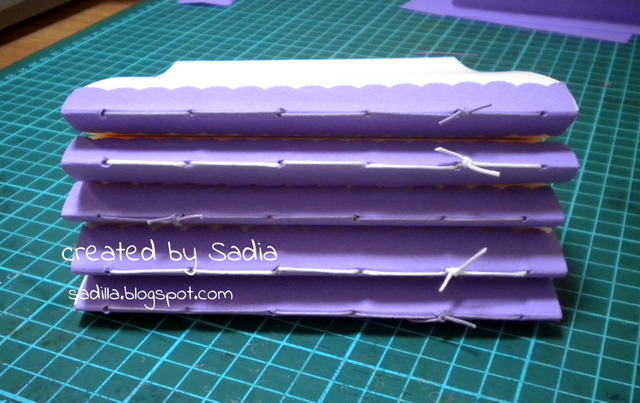
Una volta fatti tutti i gruppetti come vedete nella foto sopra, possiamo procedere con la cucitura, che ci consentirà di rilegare le pagine col nastro.

Once you made the groups as you see in the picture above, you can sew the pages, making the slots will host the ribbon.


Una cosa molto importante a questo punto è prendere bene le misure del nastro. I punti che andremo a creare ora, che costituiranno gli "anelli" in cui passare il nastro devono essere molto precisi, e della stessa misura del nastro stesso, in modo da limitarne il gioco ed i movimenti, questo renderà la struttura più stabile e solida. Per prima cosa quindi segnare con una matita i punti esatti in cui deve passare il filo, a questo punto si può cucire. Io ho bucato la carta con un punteruolo, e poi ho usato un ago da lana, con la punta arrotondata, ma se preferite potete usare una ago con la punta! ;)

Something really important is to be very careful measuring the ribbon: the slots you'll make must be exactly the same size of the ribbon, in order to keep it firm, this will make the all structure more stable. So first of all sign were the wire has to be stitched. I made the holes with a awl, and then sewed with a needle for wool, which isn't sharp, but you can also use a sharp needle if you prefer! =)


Questo è il risultato finale che dovete ottenere.

This is the final result that you'll have.


l'operazione va ripetuta con tutti i gruppetti di carta... e questo è il risultato.


A questo punto possiamo costruire la copertina. Tagliare i 3 pezzi in cartone grosso, le copertine devono essere sempre un pò più grandi delle pagine interne, dovrebbero sporgere di 1/4" almeno sui 3 lati esterni, quindi vanno prese con cura le misure. Anche per il dorso è opportuno prendere la misura accuratamente, se lo si farà troppo stretto il quaderno rimarrà sempre mezzo aperto, se lo si farà troppo alto rimarrà storto e con il fronte inclinato...
Una volta tagliati i pezzi posizionarli sulla tela di lino grezzo, lasciano circa 1" in più di tessuto su ogni lato, per rifinire l'interno, e distanziando i 3 pezzi al centro di circa1/8", giusto il tanto che consentirà uno "snodo" agevole delle copertine. 
A questo punto stendere la colla sul cartone, e farlo aderire bene al tessuto. Io uso la colla renkalik per cartonaggio, che va benissimo sia per la carta che per la stoffa, perché non macchia e non deforma il cartone.

Now we build the cover, you need to cut the 3 pieces of thick card stock, at least 1/4" larger of the pages for 3 sides, so you have to measure the pages. Also for the back you have to be careful, if you make it too small the book will not close, if to make it too large it will be crooked and inclined.
Once you have the parts you can punt them on the linen, and start to glue them, leaving at least 1" in each side more then the card stock, as the picture show. I use a renkalik glue, perfect for paper, and fabric.


Una volta incollato il cartone dobbiamo rifinire per bene l'interno, è bene aiutarsi con un osso di balena, tirare bene il tessuto, per evitare le pieghe, e aiutarsi a piegare bene il tessuto negli angoli, dopo aver tagliato l'eccesso, come vedete in foto.

Once you stuck the card stock, you can refine the inner side, and you can use the busk, to avoid folds, and signs on the linen fabric, and you can fold the corner as I show you in the pictures, after cutting the fabric.


Anche le pieghe del dorsino vanno rifilate per bene, e segnate accuratamente con la stecca, per permettere al quaderno di aprirsi senza fatica... con una striscia dello stesso tessuto infine rifinire la parte centrale.

You should press carefully also the folds of the back, in order to make the book soft, and easy to open and close... finally with a stripe of the same fabric, you can refine the center. 


Dopo aver rifinito per bene anche l'interno della copertina, procedere facendo dei piccoli precisi taglietti lungo la piega del dorso, ogni taglietto dovrà essere lungo quanto l'altezza del nastro, come gli anelli della cucitura delle pagine.

After you finished to refine the inner, you have to cut across the back fold, making 3 holes as long as the slots wire.


Con la stecca di balena aiutarsi poi a fare entrare il nastro nei tagli... procedere con delicatezza per non allargare troppo i tagli, e non rovinare il tessuto.

With the stuck you make the ribbon entering the holes, watch out not to ruin the fabric.


E allo stesso modo fare passare il nastro anche nelle asole della cucitura.

In the same way you have to make the ribbon entering the slots.


Una volta "acchiappate" col nastro tutte le asole, far uscire i nastri dalla copertina, l'effetto sarà questo... a questo punto basta fare i nodi....

once you have made it you only have to make the knots.... 


E il gioco è fatto! ;)
che ne dite??? spero di essere stata chiara... e spero che vi piaccia!!! =)
Un grazie a Carlino che mi ha aiutato un pò con le foto... e grazie a voi per le visite ed i bellissimi commenti che mi lasciate.... a presto!!!!

That's it!!
What do you think?? I hope I was clear and that you like it!!! =)
a big thank you to Carlino, who helped me with the pictures, and and a big thanks to all of you who visit my blog, and leave me so many lovely comments!! =) See you soon back! XD
Related Posts Plugin for WordPress, Blogger...